Current release: 3.0.3 alpha international for Windows and Linux. This guide retains earlier screenshots and version-specific descriptions. Their original version labels are preserved; appearance and window placement may differ in 3.0.3. See the release notes.
Workflow
Using spectrIm-QMRS as a DICOM listener
spectrIm-QMRS can be configured as a DICOM network receiver so that a
scanner, PACS, or another workstation can send image and spectroscopy
DICOM objects directly to the application computer. This page describes
the practical setup steps and the clinical-network concepts behind the
DICOM listener workflow.
In DICOM terminology, spectrIm-QMRS acts as an Application Entity
that can accept incoming DICOM associations. The sending system
needs the spectrIm-QMRS AE title, IP address, and port number. The
receiving computer must also be reachable through the hospital
network and local firewall.
Received DICOM objects can then be stored and renamed using DICOM
metadata. The resulting directory can be inspected with the
Patient/Study Browser,
where images and spectroscopy series can be loaded for processing,
fitting, mapping, and reporting.
Step 1: configure DICOM nodes
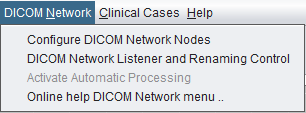
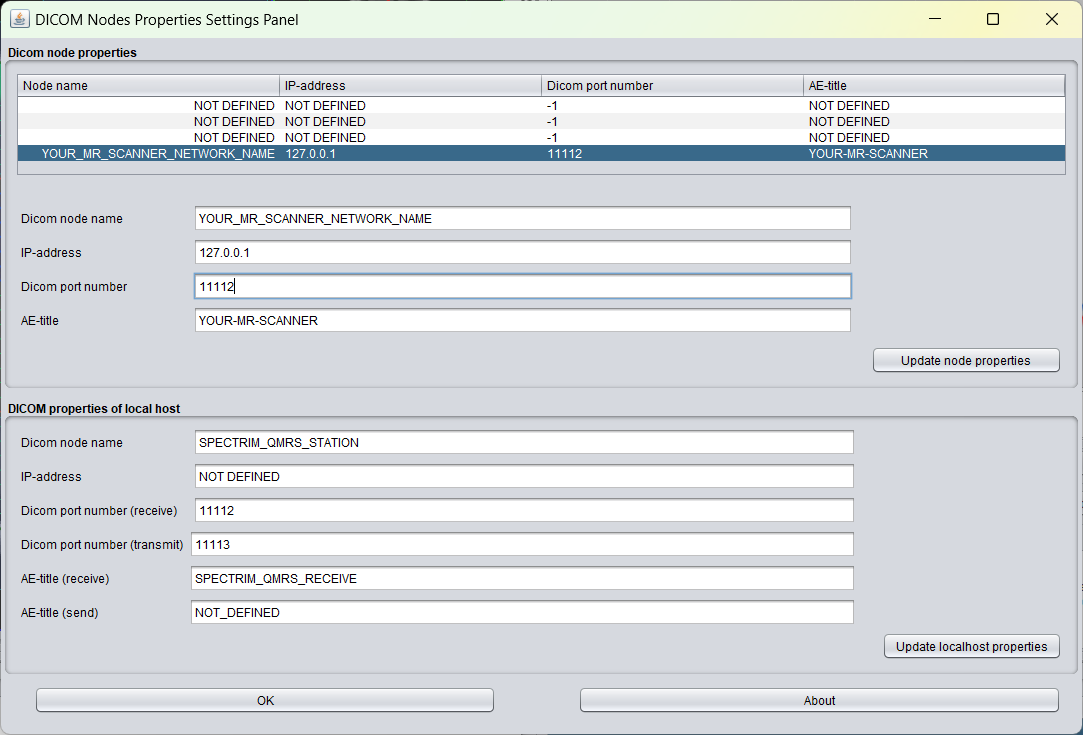
Open DICOM Network > Configure DICOM Network Nodes.
Configure the local spectrIm-QMRS node with a clear name, a stable IP
address, a receive port, and an AE title. The old documentation used
11112 as an example DICOM port and
SPECTRIM_QMRS_RECEIVE as an example receive AE title.
Also configure the remote DICOM node that will send data to spectrIm,
such as the MR scanner, PACS, or satellite console. At minimum this
requires the remote node name, IP address, port, and AE title.
To be updated: add the version 3.0.1 Alpha DICOM node
configuration dialog screenshot and confirm the exact visible fields.
Step 2: register spectrIm-QMRS on the sender
Most clinical DICOM senders do not send data to arbitrary computers.
The spectrIm-QMRS receiving node usually has to be entered on the
scanner, PACS, or routing system by an administrator. The sending
system must know the same AE title, IP address, and port configured
in spectrIm-QMRS.
For stable clinical operation, use a fixed IP address or a
hospital-managed hostname. If the computer receives a new DHCP
address after reboot or reconnection, DICOM transfer from the
scanner may fail even when the spectrIm-QMRS settings look correct.
Step 3: start listener and renaming control
Open DICOM Network > DICOM Network Listener and Renaming
Control. This control window starts the receiving workflow and
defines how incoming DICOM files are stored and renamed. Renaming is
important because raw DICOM network filenames are often not useful for
a human operator, while tag-based folder and file names can preserve
study, series, acquisition, and instance information.
This is a legacy listener screenshot copied from the previous website.
Replace it with a version 3.0.1 Alpha screenshot after confirming
the listener window still has the same controls.
Step 4: send data from scanner or PACS
Once the listener is running, send the relevant image and spectroscopy
series from the scanner, PACS, or DICOM router to the spectrIm-QMRS AE
title. For MRS(I), it is usually useful to send both the spectroscopy
data and the corresponding anatomical images needed for spatial
orientation, voxel/grid display, and map overlays.
After transfer, inspect the received directory and make sure the series
were received completely. Missing image slices, incomplete spectroscopy
instances, or wrong patient/study routing should be corrected before
preprocessing or fitting.
Step 5: mount and review received data
The received and renamed directory can be mounted with the
File menu. The
Patient/Study Browser
then shows the DICOM hierarchy and lets the user load image and
spectroscopy series into the Clinical Viewer.
From this point onward, the normal analysis workflow applies:
inspect spectra in anatomical context, choose voxels or regions,
preprocess data, create simple feature maps, and then continue to
TDFDFit quantification when quantitative results are required.
If the mounted directory contains screenshots or imported images
stored as DICOM Secondary Capture objects, these can be opened in a
separate viewer frame from the Patient/Study Browser. See the
Secondary Capture workflow.
DICOM and dcm4che references
DICOM standard
DICOM is both a file format and a network protocol for medical
imaging objects. The same metadata that identifies patient,
study, series, modality, and acquisition geometry is also used
by spectrIm-QMRS to sort, display, and rename received data.
spectrIm-QMRS uses the Java dcm4che ecosystem for DICOM
parsing and network-related tooling. The project contains
dcm4che2 2.0.29 components such as
dcm4che-tool-dcmrcv, dcmsnd, and
dcmecho, plus selected dcm4che 3.3.7 libraries.
The DICOM Network menu shows an automatic-processing entry, but
it is disabled in the version 3.0.1 Alpha screenshot.
Before documenting this as a live workflow, the enabling
conditions, safety checks, and relation to Processing Actions
should be confirmed.
Clinical safety
Incoming clinical data should be handled according to local
hospital policies. Documentation screenshots should avoid
identifiable patient information unless the dataset is fully
anonymized and approved for teaching or documentation use.